Jeep Cherokee (XJ): Wheels
WHEEL DESCRIPTION The rim size is on the vehicle safety certification
label located on the drivers door shut face. The size
of the rim is determined by the drivetrain package.
Original equipment wheels/rims are designed for
operation up to the specified maximum vehicle capacity.
All models use stamped steel, cast aluminum or
forged aluminum wheels. Every wheel has raised sections
between the rim flanges and rim drop well
called safety humps (Fig. 1).
1 - FLANGE Initial inflation of the tire forces the bead over
these raised sections. In case of rapid loss of air pressure,
the raised sections help hold the tire on the
wheel.
The wheel studs and nuts are designed for specific
applications. All aluminum and some steel wheels
have wheel stud nuts with an enlarged nose. This
enlarged nose is necessary to ensure proper retention
of the wheels. Do not use replacement studs or nuts
with a different design or lesser quality. Inspect wheels for: NOTE: Do not attempt to repair a wheel by hammering,
heating or welding.
If a wheel is damaged an original equipment
replacement wheel should be used. When obtaining
replacement wheels, they should be equivalent in
load carrying capacity. The diameter, width, offset,
pilot hole and bolt circle of the wheel should be the
same as the original wheel.
WARNING: FAILURE TO USE EQUIVALENT
REPLACEMENT WHEELS MAY ADVERSELY AFFECT
THE SAFETY AND HANDLING OF THE VEHICLE.
USED WHEELS ARE NOT RECOMMENDED. THE
SERVICE HISTORY OF THE WHEEL MAY HAVE
INCLUDED SEVERE TREATMENT OR VERY HIGH
MILEAGE. THE RIM COULD FAIL WITHOUT WARNING. Radial runout is the difference between the high
and low points on the tire or wheel (Fig. 2).
Lateral runout is the wobble of the tire or wheel.
1 - RADIAL RUNOUT Radial runout of more than 1.5 mm (.060 inch)
measured at the center line of the tread may cause
the vehicle to shake.
Lateral runout of more than 2.0 mm (.080 inch)
measured near the shoulder of the tire may cause the
vehicle to shake.
Sometimes radial runout can be reduced. Relocate
the wheel and tire assembly on the mounting studs
(See Method 1). If this does not reduce runout to an
acceptable level, the tire can be rotated on the wheel.
(See Method 2). METHOD 1 (RELOCATE WHEEL ON HUB) (1) Drive vehicle a short distance to eliminate tire
flat spotting from a parked position.
(2) Check wheel bearings and adjust if adjustable
or replace if necessary.
(3) Check the wheel mounting surface.
(4) Relocate wheel on the mounting, two studs
over from the original position.
(5) Tighten wheel nuts until all are properly
torqued, to eliminate brake distortion.
(6) Check radial runout. If still excessive, mark
tire sidewall, wheel, and stud at point of maximum
runout and proceed to Method 2. METHOD 2 (RELOCATE TIRE ON WHEEL) NOTE: Rotating the tire on wheel is particularly
effective when there is runout in both tire and
wheel.
(1) Remove tire from wheel and mount wheel on
service dynamic balance machine.
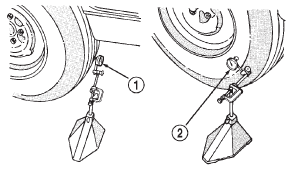
(2) Check wheel radial runout (Fig. 3) and lateral
runout (Fig. 4). (3) If point of greatest wheel lateral runout is near
original chalk mark, remount tire 180 degrees.
Recheck runout, Refer to match mounting procedure.
1 - MOUNTING CONE The wheel studs and nuts are designed for specific
applications. They must be replaced with equivalent
parts. Do not use replacement parts of lesser quality
or a substitute design. All aluminum and some steel
wheels have wheel stud nuts which feature an
enlarged nose. This enlarged nose is necessary to
ensure proper retention of the aluminum wheels.
NOTE: Do not use chrome plated lug nuts with
chrome plated wheels.
Before installing the wheel, be sure to remove any
build up of corrosion on the wheel mounting surfaces.
Ensure wheels are installed with good metal-to-metal
contact. Improper installation could cause loosening
of wheel nuts. This could affect the safety and handling
of your vehicle.
To install the wheel, first position it properly on
the mounting surface. All wheel nuts should then be
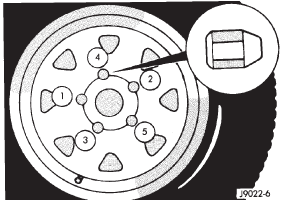
tightened just snug. Gradually tighten them in sequence to the proper torque
specification (Fig. 5).
Never use oil or grease on studs or nuts.
1 - MOUNTING CONE
WHEEL REPLACEMENT Wheels must be replaced if they have: Wheel repairs employing hammering, heating, or
welding are not allowed.
Original equipment wheels are available through
your dealer. Replacement wheels from any other
source should be equivalent in: Failure to use equivalent replacement wheels may
affect the safety and handling of your vehicle.
Replacement with used wheels is not recommended.
Their service history may have included severe treatment. It is recommended that a two plane service
dynamic balancer be used when a tire and wheel
assembly require balancing. Refer to balancer operation
instructions for proper cone mounting procedures.
Typically use front cone mounting method for
steel wheels. For aluminum wheel use back cone
mounting method without cone spring.
NOTE: Static should be used only when a two
plane balancer is not available.
NOTE: Cast aluminum and forged aluminum wheels
require coated balance weights and special alignment
equipment.
Wheel balancing can be accomplished with either
on or off vehicle equipment. When using on-vehicle
balancing equipment, remove the opposite wheel/tire.
Off-vehicle balancing is recommended.
For static balancing, find location of heavy spot
causing the imbalance. Counter balance wheel
directly opposite the heavy spot. Determine weight
required to counter balance the area of imbalance.
Place half of this weight on the inner rim flange and
the other half on the outer rim flange (Fig. 6).
For dynamic balancing, the balancing equipment is
designed to locate the amount of weight to be applied
to both the inner and outer rim flange (Fig. 7).
1 - HEAVY SPOT
1 - CENTER LINE OF SPINDLE TORQUE CHART DESCRIPTION TORQUE Lug Nut 1/2 X 20 with 60 Cone . . . . . . . . . . 115-150 N·m
(85-115 ft. lbs.)Description and operation

Fig. 1 Safety Rim
2 - RIDGE
3 - WELLDiagnosis and testing
Wheel inspection
Tire and wheel runout

Fig. 2 Checking Tire/Wheel/Hub Runout
2 - LATERAL RUNOUT

Fig. 3 Radial Runout
2 - SPINDLE SHAFT
3 - WING NUT
4 - PLASTIC CUP
5 - DIAL INDICATOR
6 - WHEEL
7 - DIAL INDICATORService procedures
Wheel installation

Fig. 4 Lateral Runout
2 - SPINDLE SHAFT
3 - WING NUT
4 - PLASTIC CUP
5 - DIAL INDICATOR
6 - WHEEL
7 - DIAL INDICATOR
Fig. 5 Lug Nut Tightening Pattern
Tire and wheel balance

Fig. 6 Static Unbalance & Balance
2 - CENTER LINE OF SPINDLE
3 - ADD BALANCE WEIGHTS HERE
4 - CORRECTIVE WEIGHT LOCATION
5 - TIRE OR WHEEL TRAMP, OR WHEEL HOP
Fig. 7 Dynamic Unbalance & Balance
2 - ADD BALANCE WEIGHTS HERE
3 - CORRECTIVE WEIGHT LOCATION
4 - HEAVY SPOT WHEEL SHIMMY AND VIBRATIONSpecifications
Other materials:
Adaptive cruise control (acc)
Adaptive Cruise Control (ACC) increases the driving
convenience provided by cruise control while traveling
on highways and major roadways. However, it is not a
safety system and not designed to prevent collisions.
Electronic Speed Control function performs differently.
Please refer to the p ...


